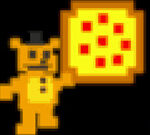
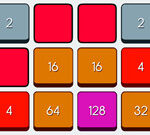
Your videos look flat when your face is lit like a ceiling calendar. Shadows pool under your eyes, backgrounds steal attention, and your camera just records what it sees.
The good news? Better video lighting doesn’t need a studio budget. You can get a cleaner look using what you already have, like a window, desk lamps, and a sheet of paper.
In 2026, creators keep moving toward softer, natural styles that feel calm and real. That trend shows up in vertical vlogs and talking-head clips, where gentle light makes people trust what they see.
Now, let’s turn your lighting from “fine” into “watchable,” using simple setups you can test today.
Get Pro Results with Free Natural Window Light
If you have a window, you already have the most beginner-friendly key light. Window light is soft, and it wraps around your face instead of stabbing it. PhotoWorkout calls window light one of the most accessible and flattering options because you can shape it with basic modifiers like white sheets and reflectors (Window light photography complete guide).
Here’s the fastest way to try it. Place your camera so it faces you, then move your body until the window light hits your face from an angle. Next, test one change at a time, because small shifts make a big difference on phone cameras. Also, consider turning off other room lights. Mixed light often creates odd color casts and makes your skin look tired.
Before you start, do a quick room scan. If the window blasts direct sun, you’ll see harsh shadows on one side. However, you can tame that with diffusion, like a curtain, white sheet, or even poster board held near the glass.
A simple window setup works for both beauty-style talking heads and casual vlog shots. It also fits the current “soft and cozy” look many creators want in 2026, where skin tones look natural and backgrounds feel less harsh.

Start with this quick window-light checklist
- Face the light at an angle (not straight into it).
- Turn off ceiling lights and lamps in the background.
- Diffuse direct sun using a white sheet or curtain.
- Watch your phone screen and adjust your distance.
If you don’t have a usable window, you can still mimic the look. Fstoppers shares a method for creating believable window light without a window, using a controlled setup (Create believable window light without a window).
And if your background keeps stealing the show, focus first on your face. Window light gives you a reliable starting point for cleaner, more trust-building videos.
Position Yourself for the Best Window Glow
Angles control everything. Instead of sitting square to the window, aim for a 45-degree position. A simple rule works well for most people: if your camera sits at “12 o’clock,” try placing the window around “1 o’clock” or “11 o’clock.”
That angle gives you even illumination on the front of your face, with gentle shadow on the far side. The result looks more like a real scene, not a bright interrogation.
Next, watch your height. Keep the window light roughly at your eye level. If the light comes from above, you’ll get eye shadows. If it comes from below, you’ll get that “creepy upside-down” look no one wants.
Glasses can also cause glare. If you wear them, turn your head slightly, not the whole setup. Then, check reflections in both lenses. You might also angle the glasses down a touch so the reflection falls away from the camera.
If your eyes look dark in the footage, raise the light source slightly, or move your chair closer. Small moves fix a lot.
Now, consider a common mistake. People often sit too far from the window. When you move farther away, the light gets weaker and your camera compensates with more noise or softer focus. So, step closer until your face looks bright but still natural.
Finally, do one test with your phone camera. Stand the phone where it will live during filming. Then, record a 10-second clip. Screen brightness on your phone can trick you, so rely on the clip more than your eyes.
Once your window angle looks good, you can make it even better with simple diffusion.
Soften Sunlight Using Sheets or Foil
Direct sun is powerful. That’s also why it creates harsh contrast and sharp shadows. The goal is simple: spread the light so it lands on your face more gently.
You can soften it in two common ways.
First, use a white sheet. Hold it over the window like a makeshift diffuser. You want the light to pass through and glow, not blast through as a hard beam. If you can, clip the sheet so it stays still. Then, record again.
Second, use foil for bounce. Crinkle a piece of aluminum foil (or use a reflective board) and place it on the shadow side of your face. Keep it close enough to fill in shadows, but not so close that it over-brightens you. Think “light kiss,” not “flashlight.”
Here’s a quick before-and-after experiment. Record one clip with direct sun. Then, soften with a sheet. After that, add foil bounce. You’ll see the shadows under your eyes lift, and your skin tones look smoother.
Also, pay attention to the background. If the background stays too bright, your viewer’s eyes jump away. So, move your body slightly so the window doesn’t fully light the wall behind you. If you can’t move, add a towel or small blanket to block stray light.
If you like learning by examples, this kind of “use what you have” approach shows up in DIY lighting guides too. For instance, DIYPhotography shares inexpensive ways to build cinematic lighting at home (The cheapest and easiest DIY cinematic lighting setup). You don’t need the exact gear. You just need the same thinking.
When your window light is soft, your videos already look more polished. Still, many creators want more depth and consistency. That’s where a two-light setup shines.
Build an Easy Two-Light Setup with Desk Lamps and Phones
Window light is great, but it’s not always available. Also, weather and time can ruin your schedule. A two-light setup keeps your look stable.
In 2026, many creators build toward cozy, textured effects that feel warm and real. You can get that depth with a simple plan: a key light, a fill light, and optional back separation. You don’t need fancy panels. A desk lamp and your phone flashlight can work as long as you diffuse them.
For the main look, think of it like this. The key light paints your face. The fill light smooths the shadows. Then, a back light adds a rim of glow so you don’t melt into the background.
A lot of lighting guides follow this same logic. You can often start with two lamps and upgrade from there, but the core setup stays simple.
Here’s a quick comparison to help you choose your starting point.
| Setup | What it looks like | Best for |
|---|---|---|
| One light (window or lamp) | Bright face, deeper shadows | Fast vlogs, casual talks |
| Two lights (key + fill) | Cleaner skin, softer contrast | Beauty videos, interviews |
| Window + bounce (foil or sheet) | Natural feel, gentle depth | Cozy, daylight look |
The takeaway is simple. Two lights help you look like you planned the shoot, even if you didn’t.
Place Your Key Light for Main Face Illumination
Your key light should hit your face at about a 45-degree angle. If you’re using a desk lamp, aim it toward you, then diffuse it. Without diffusion, you’ll see tiny bright hotspots and harsh shadow edges.
Diffusion can be super basic. Try tissue paper, parchment paper, or a thin cloth held between the lamp and your face. Keep the diffusion a few inches away from the bulb if possible. Also, make sure the material doesn’t touch the lamp or get too hot.
Now set the height. Aim for the key light level with your eyes. When the light sits too low, you’ll get shadow under your nose. When it sits too high, you’ll see shadow under your brows.
Finally, check your exposure. Phone cameras auto-adjust, so what looks bright in the screen preview can shift during recording. Shoot a short test clip. Then, lock your camera exposure if your app allows it, or at least keep the scene unchanged.
Add Fill Light to Fill in Shadows Gently
Your fill light should be softer and weaker than your key light. If the fill matches the key, your face turns flat again.
Place the fill on the opposite side of the key light. Then, move it farther away to make it less intense. If you only have one lamp, you can still do this with bounce. Hold foil or a white board near the shadow side and let your key light reflect into that area.
The goal is not to erase shadows completely. Real faces have texture. With good fill, the shadows look controlled instead of scary.
Also, keep an eye on the background. If your fill light spills everywhere, your room will look busy. So, aim it at your face area, then mask stray spill with a pillow, folded blanket, or even a bookcase edge.
If one side of your face looks “washed out,” your fill light is too strong. Lower it, move it back, or reduce bounce.
When your key and fill look good, add one last step for separation. That step makes your video feel more “set up,” even with household lights.
Light from Behind to Separate You from the Background
A back light is the easiest way to stop that “I’m floating in a wall of light” look. It’s not about making your whole background bright. It’s about giving you a rim of light around your shoulders or hair.
Try this. Place your lamp or phone light behind you, aimed toward your shoulders. Keep it higher than your face and lower than the top of your head. Diffuse it the same way as your key light. If you use a phone, point it and diffuse with a small tissue screen.
Then, turn it down. If the back light is too strong, it becomes a glowing halo. If it’s too weak, you won’t notice it. So, adjust until you see separation, especially around hair edges and shoulders.
This is also a great way to get a moody, cozy vibe. When your background stays darker, the rim light gives warmth and depth. That matches what many short-form creators chase in 2026.
Now you’ll have solid lighting structure. Next, make it look dreamy by controlling harshness, bounce, and color.
Diffuse, Bounce, and Match Colors for Dreamy 2026 Lighting
Even a great two-light setup can look off if your light is harsh or your colors fight each other. Viewers feel that mismatch fast. Your job is to smooth the light and keep the color consistent.
Start with diffusion. Whenever light looks too sharp, add a layer between the source and you. Then, bounce that softened light with foil or a white board. After that, match your bulbs.
Because bulbs change color. A “daylight” bulb and a “warm” bulb together create mixed tones. Your skin may look yellow next to the background, even if you don’t notice while filming. So, pick one temperature and stick to it.
If you want more ideas for diffusion tricks, FilmDaft lists several DIY options people already own. It also includes important safety notes about heat and placement (Five DIY video light diffusers you already own). Use that mindset: soften first, then keep things safe.
Finally, deal with background distractions. Simple rooms look better when you remove shiny highlights and bright corners.
Everyday Ways to Soften Harsh Light Sources
You don’t need a studio softbox to diffuse. You need a barrier that spreads the light.
Try these quick hacks:
- Cover a lamp with parchment to turn glare into a glow.
- Stretch tissue over your phone light to soften a small source.
- Use a cardboard frame as a diffuser holder, then test angles.
- Move the light farther away if you can, then compensate with bounce.
If you’re using a phone flashlight, it can get too intense at close range. So, back it up and diffuse. The smaller the source, the more dramatic the shadow shapes. Diffusion reduces that drama in a good way for talking heads.
Also, avoid overhead lights. Ceiling fixtures create shadows under eyes and under the chin. If you must keep a ceiling light on, turn it down low or block it. Otherwise, it’ll fight your main look.
Overhead light turns flattering lighting into “tired face” lighting. Even one ceiling bulb can ruin your shot.
Smart Tricks to Control Your Room’s Background
A big part of “professional lighting” is actually background control. Your viewer reads the background before they notice your face.
First, look for shiny surfaces. Mirrors, glass frames, and glossy walls throw bright highlights. If you can, move your setup so those reflections don’t land behind you.
Second, manage wall color. Light walls bounce more light than dark walls. If your background is dark, you may need a bit more fill to avoid a heavy silhouette. If your background is light, reduce spill so your video doesn’t look washed out.
Third, use simple blockers. A towel, blanket, or even a small box positioned off camera can stop stray light. This helps your background stay darker, which makes you stand out with rim light.
If you want a quick window-light workflow that focuses on video quality, Conquer the Digital Empire walks through how to use window light to improve your results (How to use window light for the best video quality). Use the concepts, not the gear.
Now, one more detail people skip: record and review in short bursts. Watch for color shifts and shadow edges. Then, change one thing. Move the lamp 6 inches. Add or remove diffusion. Re-test.
After a few tries, your lighting becomes repeatable. That’s what turns random good days into consistent good videos.
Conclusion
Flat, shadowy video lighting makes people feel like they need to “guess” what they’re watching. Softer light fixes that fast, especially when you start with a window.
You also get better results when you build a simple two-light plan. Use a key light for your face, add a gentle fill, then use a back light to separate you from the background.
Pick one technique today and test it with a 10-second clip. Then, adjust slowly, because small changes matter.
If your next video looks clearer, share your setup in the comments. Your best fix might help someone else fix theirs.